
How to Properly Repair Cracks in Your Siding
 Siding is your home’s armor against weather and moisture damage. If you have damaged siding, it should be repaired quickly and correctly to prevent water and mold damage to the home’s structure.
You can use paintable filler to match your house color for small holes, cracks, and dents. Then, you can paint over it to hide the repair. For professional help, call Siding Repair Charleston SC.
A crack in your siding is not only an eyesore, it can allow water to enter your home. This can cause serious structural problems and lead to mold, rot, and other damage to your home’s exterior. The good news is that it’s easy to repair cracked siding.
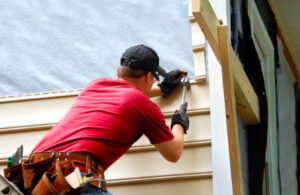
The first step in any repair is to assess the situation and identify the cause of the crack. Depending on the extent of the damage, you may need to replace entire panels. Using a ladder or scaffolding to safely reach the affected areas will ensure you can get your work done efficiently and effectively.
If the crack is caused by a nail hole, it is often a simple matter of patching and painting. If the crack is due to a problem with the underlying structure, you will need to hire a professional.
If your siding is over twenty years old, it’s probably faded and weakened by UV rays. This can make it easier for small pebbles and nickel-sized hail to crack it. If you are getting frequent small hail storms in your area, it may be time to consider replacing your siding.
The key to repairing cracks in vinyl siding is to use the right product for the job. For smaller holes and cracks, use a filler such as DAP Platinum Patch Advanced Exterior Filler. Stir the filler thoroughly before applying it, then use a plastic putty knife to apply a thin coat of filler. If the crack or hole is deeper, apply two thin layers of filler, allowing it to dry in between applications. Once the filler is dry, sand it smooth and paint with the color that matches your siding.
For larger cracks, you will need to cut away the damaged section of siding and replace it with a new piece. Then, nail the replacement panel to the wall with stainless steel siding nails. Start at the top of the panel, then work your way down to each end of the panel. It is important to nail the panel securely, but not so tight that it buckles under its own weight.
Holes
Holes in your siding don’t just look ugly, they let water and pests into your home, leading to serious damage. Whether they’re caused by harsh weather or holiday decorating mishaps, holes should be repaired right away to keep moisture and pests from damaging your house.
Thankfully, fixing holes in your siding is relatively simple if you follow a few straightforward steps. The first step is to clean the area surrounding the hole, using mild soap and water, then letting it dry. After that, you’ll want to choose a caulking method to use for the repair.
For vinyl siding, you can tackle small holes with a tube of caulk that matches your siding’s color. For larger holes, however, it’s a good idea to use a siding patch kit. These kits include a self-adhesive, lower-surface patch that can be removed and placed over the existing hole. It then comes with a second patch that can be pressed over this for additional strength and to ensure a completely waterproof repair.
If your siding is oriented strand board (OSB), you’ll need to do a little more work. Since this material is a common substitute for real wood, it’s more vulnerable to water damage than other types of materials. To remedy this, you’ll need to use a similar caulking method but with a slightly different technique. You’ll also need to purchase a piece of OSB that matches the color of your siding for the best result.
Brick siding is a popular choice for many homes due to its durability and classic style, but it’s not immune to holes or other damage. To fix a brick siding hole, you’ll need to do a bit more work than with other materials, but it’s still a fairly easy job. You’ll need a mortar mix that matches the color of your brick, a trowel, and a sponge to smooth it out and add texture.
While it’s a bad idea to cover up damaged siding, you can do a temporary repair to prevent further damage while you wait for professional contractors to arrive and make the necessary repairs. For instance, you can take a sheet of aluminum or steel and lap it up behind both courses of siding above and below the hole, securing it with caulk.
Loose Planks
A wood siding repair is a project that requires an eye for detail. A thorough inspection will reveal not only damaged boards but also areas of your house that could use additional caulking, like around windows or other areas where water may enter the home. Inspect the wood for rotting, mildew and mold spots, as well as areas that feel soft or tender when poked with a finger. These areas are a sign of excessive moisture that has penetrated the wood and caused rot.
Siding is designed to insulate your home from extreme temperature changes. However, when the insulation becomes damaged due to weather or a construction mistake, you’ll find that your energy bills are higher than expected. Often, this is because of warped or loose siding that allows moisture to seep into the house.
It’s important to note that the best way to reduce moisture intrusion is to keep gutters clean and the roof flashing properly installed. Additionally, ensuring that the wood in your home is properly protected by using the right caulking and paint will extend its life.
Loose siding that comes off the house is not only unsightly but can also be dangerous, especially during storms or strong winds. In addition, the resulting gaps can allow more moisture into the house that may lead to rot and other structural problems.
If you have a loose plank, it’s important to act immediately to prevent the situation from getting worse. The first step in repairing loose siding is to carefully remove the board from the house’s exterior. This can be done by scoring and cutting through the caulk or paint that is holding it in place with a utility knife. It’s also recommended to use a pry bar and wood shims when loosening the board in order to avoid damaging the surrounding area.
Once the old plank has been removed, you can replace it with a new one. It’s important to ensure that the new board is the correct length and width to fit the space, so use a tape measure to be sure. Next, carefully nail the new board to the studs. The nailing process will require more care than when nails were hammered into the original drywall or wood framing. Ensure that the new board is face nailed and that all nails are at least 6d and use galvanized nails to avoid rusting and further decay.
Rot
Wood rot can be a big problem for homes that have wooden siding and window sills. It can cause a lot of expensive damage and compromise the structural integrity of the home. The best way to prevent rot from occurring is to regularly inspect the exterior of your home and make prompt repairs as needed.
If you notice soft areas, cracking or discoloration of your wooden siding, you may have rotted wood. This is a sign that the fungus that causes rotting has made its way to the wood and has begun eating away at it. It is important to repair rotted wood as quickly as possible to avoid extensive structural damage.
It is also a good idea to inspect any exposed wood on the exterior of your home twice a year, especially after severe storms. This can help you spot problems before they become more serious and costly. Regular maintenance of your siding and window sills such as regular painting, proper ventilation and caulking can also help to prevent rot from affecting these areas.
Whether you have James Hardie fiber cement siding or traditional wood, if you find that your wood siding is starting to rot, it’s important to act fast. Rot mainly occurs when the wood is exposed to moisture and can be very difficult to treat once it starts. The sooner you can get to the rotted area, the more likely it is that you’ll be able to save some of the board and not have to replace it entirely.
To begin repairing your rotted siding, first take a utility knife and remove the paint around the damaged board. This will allow you to easily pry off the rotten boards without damaging your siding or the surrounding wood. Once the old boards have been removed, you can use a power tool with a wood blade to cut through any remaining rotted parts of the board. This will help to break up the wood rot and give you more room to work.
Once you have fabricated a new replacement piece of wood, apply a wood preservative to it and install it into place. Once it has dried, you can caulk around the edge of the replacement piece and seal it so that moisture doesn’t penetrate the new wood and start rotting again.